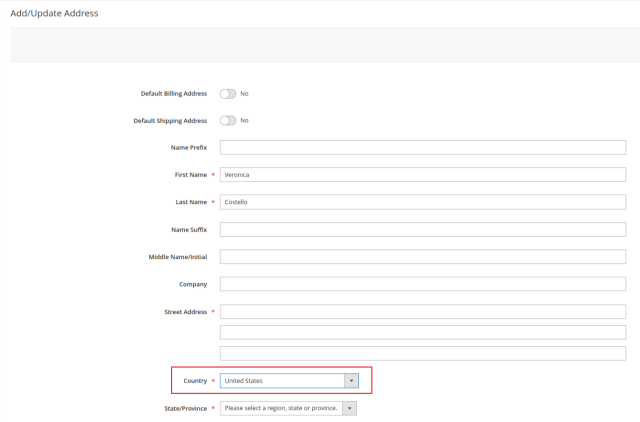
For any Magento 2 store, efficient management of customer data, particularly addresses, is vital. When your administrative team or customer service representatives frequently add or edit customer addresses in the backend, pre-filling the “Country” field can save valuable time and significantly reduce data entry mistakes.
This guide will show you how to implement a JavaScript solution using a mixin to automatically set a default country in the Magento 2 Admin’s customer address forms. This method is clean, powerful, and integrates seamlessly with Magento’s UI Components.
Key Points
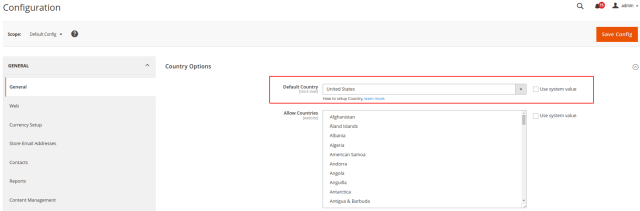
- Backend Configuration is Key: This JavaScript solution relies on the is_default flag provided by Magento’s country data. This flag is typically set via your main store configuration in Stores > Configuration > General > Country Options > Default Country. Ensure your desired default country is properly configured there.
- Allowed Countries: The default country you expect to be pre-selected must also be present in the “Allow Countries” list under Stores > Configuration > General > Country Options. If a country is not allowed, it won’t appear in the dropdown, and your mixin won’t be able to select it.
Step-by-Step Implementation
We will create a custom module (or use an existing one) to house our JavaScript mixin.
Step 1: Declare Javascript Mixin
First, tell Magento to modify an existing UI component with your mixin using arequirejs-config.jsfile in your custom module.
Create this file:app/code/VendorName/ModuleName/view/adminhtml/requirejs-config.js
var config = {
    config: {
        mixins: {
            'Magento_Ui/js/form/element/country': {
                'VendorName_ModuleName/js/form/element/country-mixin': true
            }
        }
    }
};
Step 2: Create Mixin File
Now, create the actual JavaScript file that contains your customization logic. This file will extend the original country UI component.
Create this file:app/code/VendorName/ModuleName/view/adminhtml/web/js/form/element/country-mixin.js
define([
    'jquery'
], function ($) {
    'use strict';

    return function (Country) {
        return Country.extend({
            initialize: function () {
                this._super();

                // Call the custom function to set the default country.
                this.setDefaultCountry();
            },

            /**
             * Custom method to set the default country.
             * This method checks for a 'is_default' flag in the country options.
             */
            setDefaultCountry: function () {
                var defaultCountry, defaultValue;

                this.setOptions(this.initialOptions);
                this.reset();

                // Only set a default country if no value is currently selected in the dropdown.
                // This prevents overriding a country already selected (e.g., when editing an existing address).
                if (!this.value()) {
                    defaultCountry = _.filter(this.initialOptions, function (item) {
                        return item['is_default'];
                    });

                    if (defaultCountry.length) {
                        defaultValue = defaultCountry.shift();
                        this.value(defaultValue.value);
                    }
                }
            }
        });
    }
});
Step 3: Clear Caches
Run the following command:
php bin/magento cache:flush
Output:
Conclusion
By implementing a simple JavaScript mixin, you can effectively pre-set the default country in the Magento 2 Admin Customer Address Form. This client-side optimization enhances the administrative user experience, saves time, and minimizes data entry errors, contributing to a more efficient backend workflow for your e-commerce store.
We hope this blog may be understandable and useful to you. You can email us at mage2developer@gmail.com if we missed anything or if you want to add any suggestions. We will respond to you as soon as possible. Happy to help 🙂